
Anyhoo, if you have come over from Jennifer's for the first time, or if you are a regular stalwart, 'Hello and Welcome', please be kind.
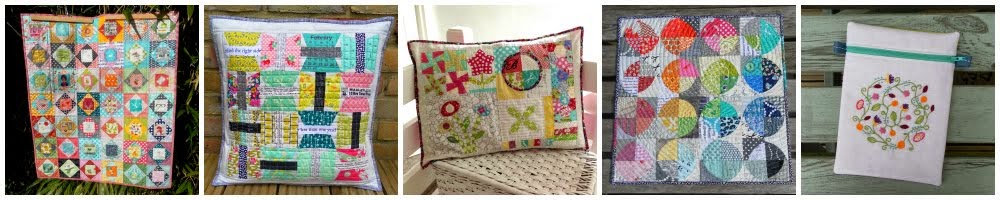
The mini quilts I have to show you have been inspired by Boo Davis of Quiltsryche. She's brilliant!
Her 'Two Heads Are Better Than One' pattern was the basis for the mini quilt I made for Sarah. The pieces are all 1.5" x 2.5", or 1.5" square, and its as much about the counting as the sewing. I love the simple method and the great effect it produces...

I made another Boo Davis-inspired mini as a Giveaway prize for my owl-loving, pod-casting friend Rhonda.

This has more variation in the piece sizes, but follows the same principle.
My dear friend Cindy also made me this awesome mug rug; again you can see the method in the madness...

If you find comfort in straight lines and love using up tiny scraps, then this style could be one for you.
Here is a brief overview of the process that anyone, who can cut and sew a straight line, can achieve...
First find an image and then using any photo-manipulator, such as online freebee Picnik (if you are quick), 'pixelate', to get you from...

...to this...
Print out and divide up your picture into the individual pieces you want to cut, working out how many of each size and colour you require, the choice is really yours...

Pull your scraps and then get cutting...

Once all the pieces are laid out, make sure to take lots of photos, as something always happens, especially if you sew on the dining table as I do, where pieces tend to go astray with regularity! Now if I had the benefit of time and space, I would have pondered over the layout of this one for far longer than I did...

Next, it's helpful to grid out the separate groups of blocks you need to piece; it's at this point you have the last chance to alter any of the layout in order to be able to join everything together easily; I am no friend of the Y-seam.

Then it's onto the sewing. A 1/4" foot is pretty much essential! It will come together really quickly, so crank the iron up to hot (press your seams open) and get going...


When selecting my backing for this one, the selvedge was simply SCREAMING to be used; I love it when that happens!

Et voila...

This one turned out a little more abstract than I was hoping, but I really like it! The twins' reaction, "Oh a beautiful sewing machine mummy!" My son's, "What is it again?". You win some, you lose some.
I am in no way an expert and I know my method is a little haphazard, but I hope this at least gives you an insight into another style suited to mini quilt making which you may, or may not, like to try.
Thank you Jennifer for organizing such a fantastic blog hop and awesome competition; I can't wait to get started on my Challenge entry!
And to anyone-else who has made it to the end of this post, thank you so much x
Thanks for the 'How To' I have learned a lot. Di xo
ReplyDeletethat is great. I have to give it a try ... thank you
ReplyDeleteYou are the best EVER! I never knew you could do that - I always just guessed, re-arranged pieces, guessed, drew on grid paper, then hoped. You're a genius. xx
ReplyDeleteThis is fantastic! I love all your pixelated quilts!
ReplyDeleteThat's really cool! I've never used picnik before. Jxo
ReplyDeleteI LOVE YOUR SEWING MACHINE!!!
ReplyDeleteThank you for inspiration and reminding me about that tool picnik!
Have a lovely weekend! x Teje
Cool idea for this Hadley - you need to show your son what a sewing machine looks like - especially if he wants any other Doctor items! He should really appreciate the excellent engineering that turns his wishes into reality with a bit of magic from mum!
ReplyDeleteThe sewing machine is so spectacularly clever. Thanks for the advice on how to 'pixelate', I'm so tempted to try it! Well done.
ReplyDeleteExcellent tute! I like your style :)
ReplyDeleteWow! Thats awesome! I thought you just kind of winged it :-)
ReplyDeleteIt looks great!!
ReplyDeleteThanks for sharing the tutorial...It's great!!
ReplyDeleteThanks for the tutorial. You make it sound like something I could possibly tackle.
ReplyDeleteGreat tutorial Hadley, you made it look very easy!
ReplyDeleteLovely tutorial - great idea. xxx
ReplyDeleteYou are a clever bunny and more than deserve to in there with all the others oln this blog hop. Love your mini!
ReplyDeleteWhat a great tutorial! Love the sewing machine mini :) x
ReplyDeleteYou are always an inspiration Hadley - great post and love your minis. x
ReplyDeleteI'm a member of your "I am no friend of the Y seam" Club! lol. Love the sewing machine.
ReplyDeleteWell, now that I know how to do that I am off to pixelate all y'alls faces. Oh what fun I will have...hehehe
ReplyDeleteOh this is just fabulous Hadley! I love it. Well done and thanks so much for taking part in the blog hop. It is I who am honored!
ReplyDeleteThanks so much for this tutorial. I had wondered how to tackle this type of look.
ReplyDeleteThis is absolutely marvelous!! I LOVE it- what a brilliant way to do this :) And I have never even tried a Y seam- heard about them- got scared- hehe!! I'm a follower now :)
ReplyDeleteFab idea there missus. I think I'd suggested to a couple of panickers about their self portrait blocks for this month's Brit Bee that they pixellate themselves, but apparently that didn't appeal lol
ReplyDeleteCongrats on your first blog hop and a great post! You'll be organising your own before we know it :)
ReplyDeleteLove your sewing machine - thanks for showing how to do it! Can't wait to see your challenge entry.
I love these quilts, and the sewing machine is wonderful. Thank you for explaining the method so well. I think you son was pulling your leg.
ReplyDeleteHadley, I LOVE your style. That sewing machine is fab!! Thanks for the tips, I can't wait to pixelate something and stitch it up! LOL
ReplyDeleteThanks for the great idea. Also, LOVE the pink mini of the Dare To Be Square owl! *squee*
ReplyDeleteSuch an effective method! Love your machine mini. You will master the Y seam at FQ retreat class, I promise!
ReplyDeleteWonderful post and a fabulous mini quilt! Like lots of others I thought you sketched the image and then transferred it to a grid and crossed your fingers - this way is much better!!! See, you didn't need to worry about your blog hop post - you triumphed. Obviously a natural!!
ReplyDeleteSo great to see a new method for mini quilts. Thanks so much for the fantastic ideas!
ReplyDeleteEncore! Encore!! You did a spectacular presentation and a huge thank you for the "picnik" link. Looks like fun :0)
ReplyDeleteCarolyn
Thanks for the tut Hadley, that sewing machine is very cool!
ReplyDeleteBrilliant post - thanks for sharing your method.
ReplyDeleteWhat a great method with great results. Thanks for sharing.
ReplyDeleteThat is such a cool process. I HAVE to try it. Thanks for the tutorial.
ReplyDeleteI made it to the end, twasn't hard at all :) my mum loves owls.........Thanks for the how to sewing machine - splendid!
ReplyDeleteHadley, this is adorable. Um, yes, YES to the selvage. Perfect addition to your little mini!
ReplyDeleteVery cool
ReplyDeleteStill stuck on the skull, that is so cool!! Clever pixelation ladies, love Posie
ReplyDeleteWhat a clever idea! Very interesting-hadn't seen that before. Fun!
ReplyDeleteGreat tutorial, thanks. Definitely one to try. Xx
ReplyDeleteBrilliant tute, I'll be giving it a go! (Love seeing my quilt.. so chuffed its mine!!!)
ReplyDeleteThis was such an eye opener to me. I wish I could have been first on the blog hop. I am so scared to post next week. I learned something today and it was nice to see how you made this fantastic mini.
ReplyDeleteOooh love your mini! I didn't know that was how they could be done, brill idea xx
ReplyDeleteI love your sewing machine. Thanks for showing how you made it!
ReplyDeleteBrilliant tutorial, I will be using this!! LOVE the sewing machine, super cute!
ReplyDeleteI love Boo, I used her book for the Robot quilt, she's amazing and straightforward piecing is always good!
LOVE this! Well done clever clogs. This is def going on the must try list.
ReplyDeleteAs usual absolutely fantastic.
ReplyDeleteLove your quilt: i need a sewing machine cover (it often sits on the dining room table during dinner!), so that would be so cute to put on it to protect it. Would you mind if I used your pattern? I like how it turned out:-) Just let me know: I don't want to use it without your permission!
ReplyDeleteHi Helen - you are a 'No Reply' blogger so I could not email you directly. Please go ahead, it isn't my pattern so stitch away xxx
DeleteOh my goodness, that sewing machine mini is just wonderful! Wow!! Thank you so much for breaking down your process, that's fantastic :)
ReplyDeleteThat's fab - I hadn't realised you could pixelate on Picnik - now I only need time to have a play! (And I love the slight abstractness of your mini quilt - it is definitely a sewing machine, but not in your face so!)
ReplyDeleteloooove the sewing machine ... my eyesight is so bad that w/o me glasses that's how I see just about everything!
ReplyDeletexxx
oh my gosh! it is so awesome hadley! you knocked it out of the park here!
ReplyDeleteSO COOL
ReplyDeleteThat is so neat! Why oh why does picnik have to go away...so sad!!!
ReplyDeleteYour sewing machine quilt is wonderful!! I love it!
ReplyDelete